 SightMill
Adding Net Promoter Score Surveys to Zendesk with SightMill
No coding required: integrate Zendesk support desk software
Adding NPS Surveys to Zendesk with SightMill
Zendesk is one of the most popular support desk / help desk systems available. It's a great way to track and manage support tickets from your customers. If you're serious about customer support, a help desk system like Zendesk can really improve your customer satisfaction.
To make sure you constantly monitor and improve your service, why not ask your customers for feedback immediately after they have finished a support call. Combine the power of Zendesk with the functionality of SightMill to automatically send out a feedback survey once you team have closed a support ticket on Zendesk.
It's straightforward to connect Zendesk and SightMill and set up an automated process that will send an email NPS survey to your customer once you have closed a ticket.
There's no coding involved and it should take around 5-10minutes to get this up and running.
What you need:
You'll need an account with Zendesk and an account with SightMill - everything required is included as standard in all SightMill plans which comes ready to integrate with Zendesk and a range of support systems (find out more about all our integrations).
All the integrations (that is, linking SightMill to another platform or website or software) are managed from your SightMill dashboard. Each of your Survey Projects can be integrated with different platforms - so you can have one Survey Project for support desk follow-up linking to Zendesk and another Survey Project gathering campaign from your website and routing it to teams via Slack.
To setup integration, open the settings for your Survey Project and you'll see a section at the bottom of the menu tree on Third-Party Integrations.
We'll be using the industry-standard webhooks API system to connect the two platforms. You'll find all the settings in your Survey Project's settings page under the 'Webhooks' menu option.
Why Integrate?
Three great reasons:
1. automate your process to save you time;
2. improve speed of communications with customers;
3. maintain an enhanced central data set to better understand your customer
Step-by-Step: How to Integrate with Zendesk
A common integration is to send an NPS email survey from SightMill when a support ticket is closed on Zendesk - giving you instant feedback on your customer support process. It's very easy to integrate SightMill to Zendesk using webhooks; here's how:
1. In SightMill - view the Survey Project's settings and make sure that under General menu your Survey Project is enabled (top toggle) and Email Surveys are enabled (penultimate toggle)
2. In SightMill - in the Survey Project's settings, check 'Email Survey Design' menu to check that your email settings are ok and there is a survey template (there should be a default template)
3. In SightMill - in the Survey Project's settings, go to the Webhooks menu and check that the top toggle is Active (to allow incoming webhooks) and select and copy the unique URL in the Email Survey field below (starts https://sightmill.com/hooks...') and click on the Save button at the bottom of the screen.
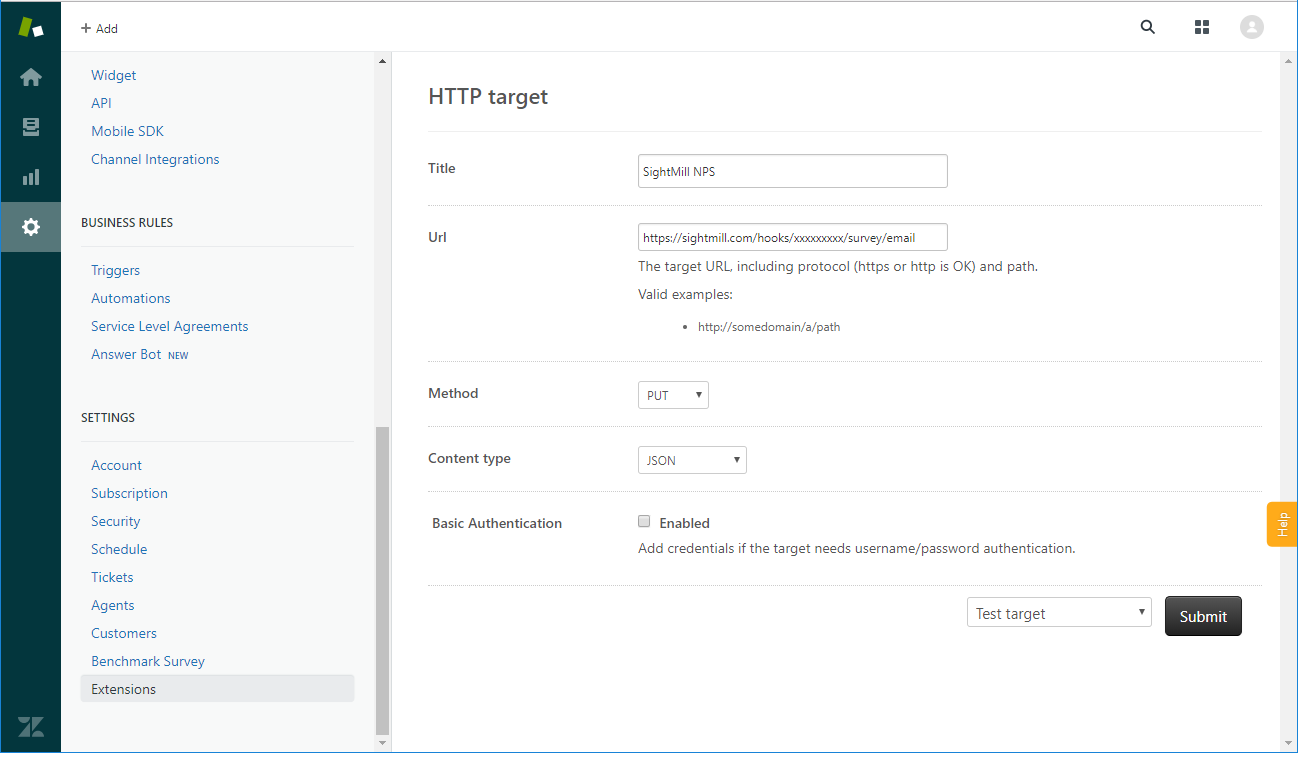
4. In Zendesk - create a new Extension using the 'http' icon from the list of available extensions:
a. paste the Email Survey URL copied from SightMill Webhooks menu (step 3)
b. Method: PUT
c. Content type: JSON
d. Leave authentication unticked
5. Still in Zendesk, to test your new Extension works and will send a sample survey, go to the bottom of the Extension setup page (by the Submit button), choose 'Test Target' and click Submit. You'll see a pop-up and be prompted to enter a JSON message: paste in this string below, replacing the 'your-email@address.com' with your email address:
{"Email":"your-email@address.com", "FirstName":"John", "LastName":"Smith", "id":"12345"}
6. Click Submit and it will pop-up a report panel. If everything worked, it should be titled 'HTTP/1.1 200 OK' and if you click on the Response tab, you'll see the response from SightMill saying it has sent a survey to your email address
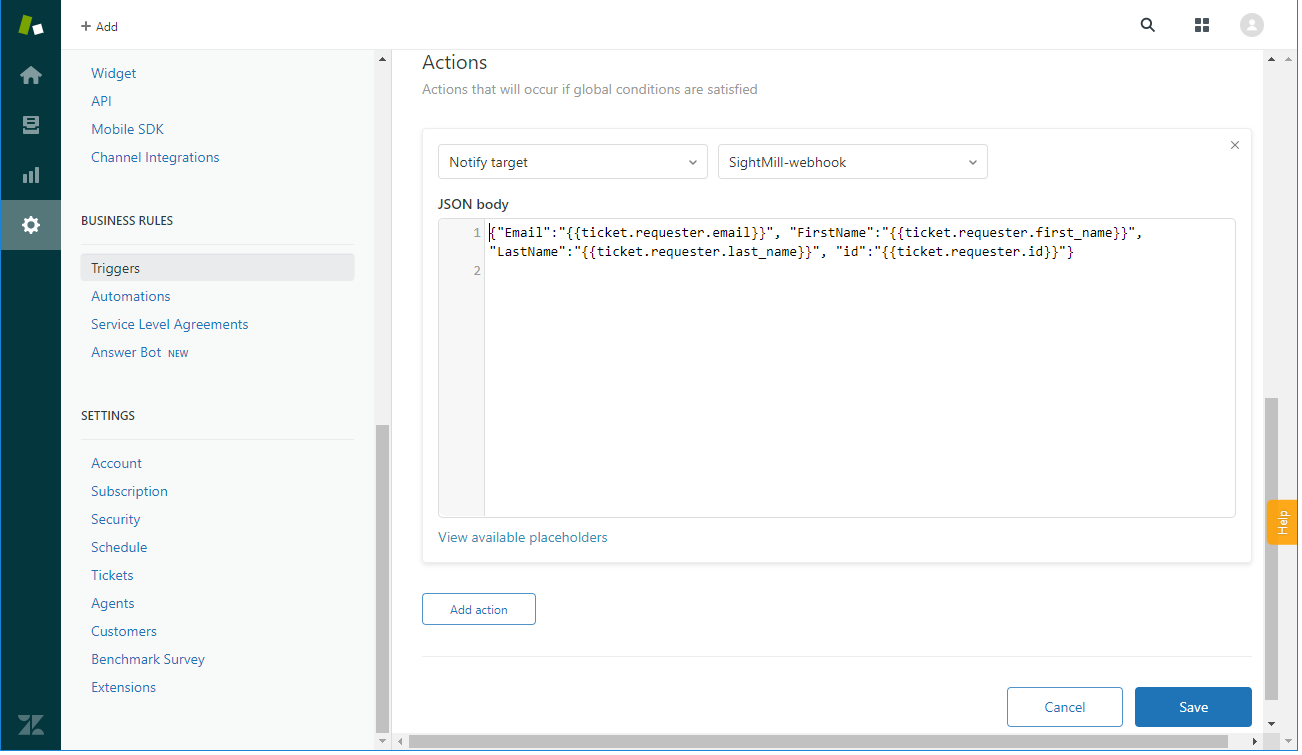
7. Finally, in Zendesk - create a new Trigger that is linked to a specific action (for example, closing a support ticket).
a. Select Trigger from the menu and click 'Create new'
b. Give the Trigger a name and setup the conditions that will generate the Trigger (eg Ticket status is updated)
c. Under the Actions, choose 'Notify Target' and then select your new Extension you created linking to SightMill
d. Paste this JSON string into the JSON Body field to send data from Zendesk to SightMill:
{"Email":"{{ticket.requester.email}}", "FirstName":"{{ticket.requester.first_name}}", "LastName":"{{ticket.requester.last_name}}", "id":"{{ticket.requester.id}}"}
If you have a problem with Zendesk integration two common traps are: in Zendesk, make sure you setup an 'http' Extension (not a 'URL' Extension); and in step 7d make sure that the SightMill field names are correctly spelled as 'Email, FirstName, LastName, id'
Start Now!
We offer Integration functionality on all of our plans (see pricing plans). Create a free trial account now to try out SightMill's integration features, then upgrade to deliver more surveys when you're ready.